Running our First External Experiment
After installation (and potentially running our first local experiment), we are now ready to run our first external experiment. For this tutorial, we will demonstrate how to run an experiment using external endpoints (taking the PacketLab team endpoints as an example) using the PacketLab software package.
1. Setup
For this tutorial, we will only use the pktxpmgr program (PacketLab Experiment Manager Utility). If pktxpmgr cannot be found via the PATH environment variable, one will need to navigate to the bin directory under the package installation directory to find the program.
In the following text, we will assume that
pktxpmgrcan be found via thePATHenvironment variable when describing the commands to run the programs.
2. Requesting experiment privileges
Instead of directly running pktxpmgr as in the local setup, to run experiments on external endpoints operated by other parties, we will need to first obtain the correct experiment privileges from them and then configure pktxpmgr to utilize those privileges. Privilege provision in PacketLab is done via the privilege owner signing a certificate to the privilege-requesting party. In many cases, this can be done by requesting the privilege-requesting party to submit a certificate signing request (CSR), after which the privilege owner can then sign the corresponding certificate based on the submitted CSR.
For convenience, during the software package user home directory setup process, CSRs for requesting experiment/representation privileges are pre-generated for experimenters and endpoint operators to use. The pre-generated X.509 CRMF CSRs can be found under
~/.pktlab/csrs.
The PacketLab team, in cooperation with the EdgeNet team, has set up external endpoints for PacketLab users to run experiments against. To obtain the certificate from us, visit our experiment privilege certificate download page, and follow the instructions on the page to upload a CSR & download the generated experiment privilege certificate.
3. Configuring pktxpmgr to use the obtained privileges
After acquiring the certificate, we will then need to set up pktxpmgr to use the new privileges. We will need to do the following steps to achieve this (using the PacketLab team certificate provision setup as an example):
- Download the CAIDA Endpoint Operator Publickey (
caida_k_eop.pub) - Move
caida_k_eop.pubto under~/.pktlab/keysviamv caida_k_eop.pub ~/.pktlab/keys - Move the downloaded certificate (
caida_exppriv.cert) to under~/.pktlab/certsviamv caida_exppriv.cert ~/.pktlab/certs - Run the following two commands to amend
~/.pktlab/xpmgr.confand~/.pktlab/xpmgr.proxy.conf:printf "%b" "\nExpExec 0::${HOME}/.pktlab/certs/caida_exppriv.cert,${HOME}/.pktlab/certs/pubcmd_exper_xc.cert:${HOME}/.pktlab/keys/caida_k_eop.pub::\n" >> ~/.pktlab/xpmgr.conf printf "%b" "\nExpExec 0::${HOME}/.pktlab/certs/caida_exppriv.cert,${HOME}/.pktlab/certs/pubcmd_exper_xc.cert:${HOME}/.pktlab/keys/caida_k_eop.pub::\n" >> ~/.pktlab/xpmgr.proxy.confNote the moved files must be named
caida_k_eop.pubandcaida_exppriv.certfor the amendment to work.Also note for the case of interacting with other PacketLab users, one can still utilize the pre-generated CSRs and submit them to the privilege owner. The privilege owner can use the
PPKSManscripts shipped within thepktlabPython module to sign the certificate based on the received CSR and hand the certificate (along with the signing key public key) back to the privilege-requesting party. The receiving party can then still follow steps 2-4 to install the new privileges, except the received key and certificate filenames need to be updated to reflect the actual filenames.
After these steps, the pktxpmgr is now configured to use the new privileges and ready to go.
4. Running the Experiment Manager
After finishing configuring pktxpmgr, we can now run our experiment on external endpoints. For this tutorial, we will directly specify the example command for running pktxpmgr. For more information on pktxpmgr, see Running our First Local Experiment - step 2.
The following instruction only applies if you have public IP on your host machine. See Running the Experiment Manager in Proxy Mode to run
pktxpmgrbehind NAT.
We can now run pktxpmgr as follows:
pktxpmgr [EXAMPLE_MLETS_DIR_PATH]/test_http_get
where [EXAMPLE_MLETS_DIR_PATH] is the path to the example_mlets directory under the installation directory.
Note when running this command, two things are happening:
pktxpmgrpublishes the experiment (in experiment descriptor form) to the CAIDA broker atpktbrokr.caida.org.pktxpmgrcreates a listening socket to greet incoming endpoints.Afterward, for any incoming endpoint,
pktxpmgralso performs TLS handshake with the endpoints, fork & exec the mlet, and forward any traffic between the endpoint and the mlet process.
4.1. Running the Experiment Manager in Proxy Mode
Note for the case where the host running pktxpmgr is behind NAT, we will need to run it in proxy mode, where the proxy is an intermediate traffic facilitator that helps forward traffic between endpoints and controllers. We can run pktxpmgr in proxy mode as follows:
pktxpmgr -c ~/.pktlab/xpmgr.proxy.conf -a pktproxy.caida.org [EXAMPLE_MLETS_DIR_PATH]/test_http_get
where [EXAMPLE_MLETS_DIR_PATH] is the path to the example_mlets directory under the installation directory.
Note when running this command, a couple of things are happening:
pktxpmgrpublishes the experiment (in experiment descriptor form) to the CAIDA broker atpktbrokr.caida.org.pktxpmgrcreates backlog connections to the proxypktproxy.caida.org(run by the PacketLab team) to register for specific SNIs (snikeys in PacketLab jargon).- The proxy accepts the registration requests and listens for incoming endpoint connections. Whenever a connection is established, the proxy tries to identify the endpoint snikey, and if the proxy found that the snikey is registered, the proxy helps forward TCP traffic between the endpoint and the registering
pktxpmgr. Based on the received TCP data from the proxy,pktxpmgrperforms the normal TLS handshake, fork & exec the mlet, and forward any traffic between the proxy and the mlet process.
5. Seeing the Result
After successfully running pktxpmgr, one should see HTML code (potentially multiple) retrieved from the HTTP server www.example.com. Congratulations, you have just run your first external experiment using PacketLab! For more information, see below for a rundown of what exactly happened for the HTML code to be displayed.
Note one can kill
pktxpmgrwith SIGINT directly.
Process Rundown
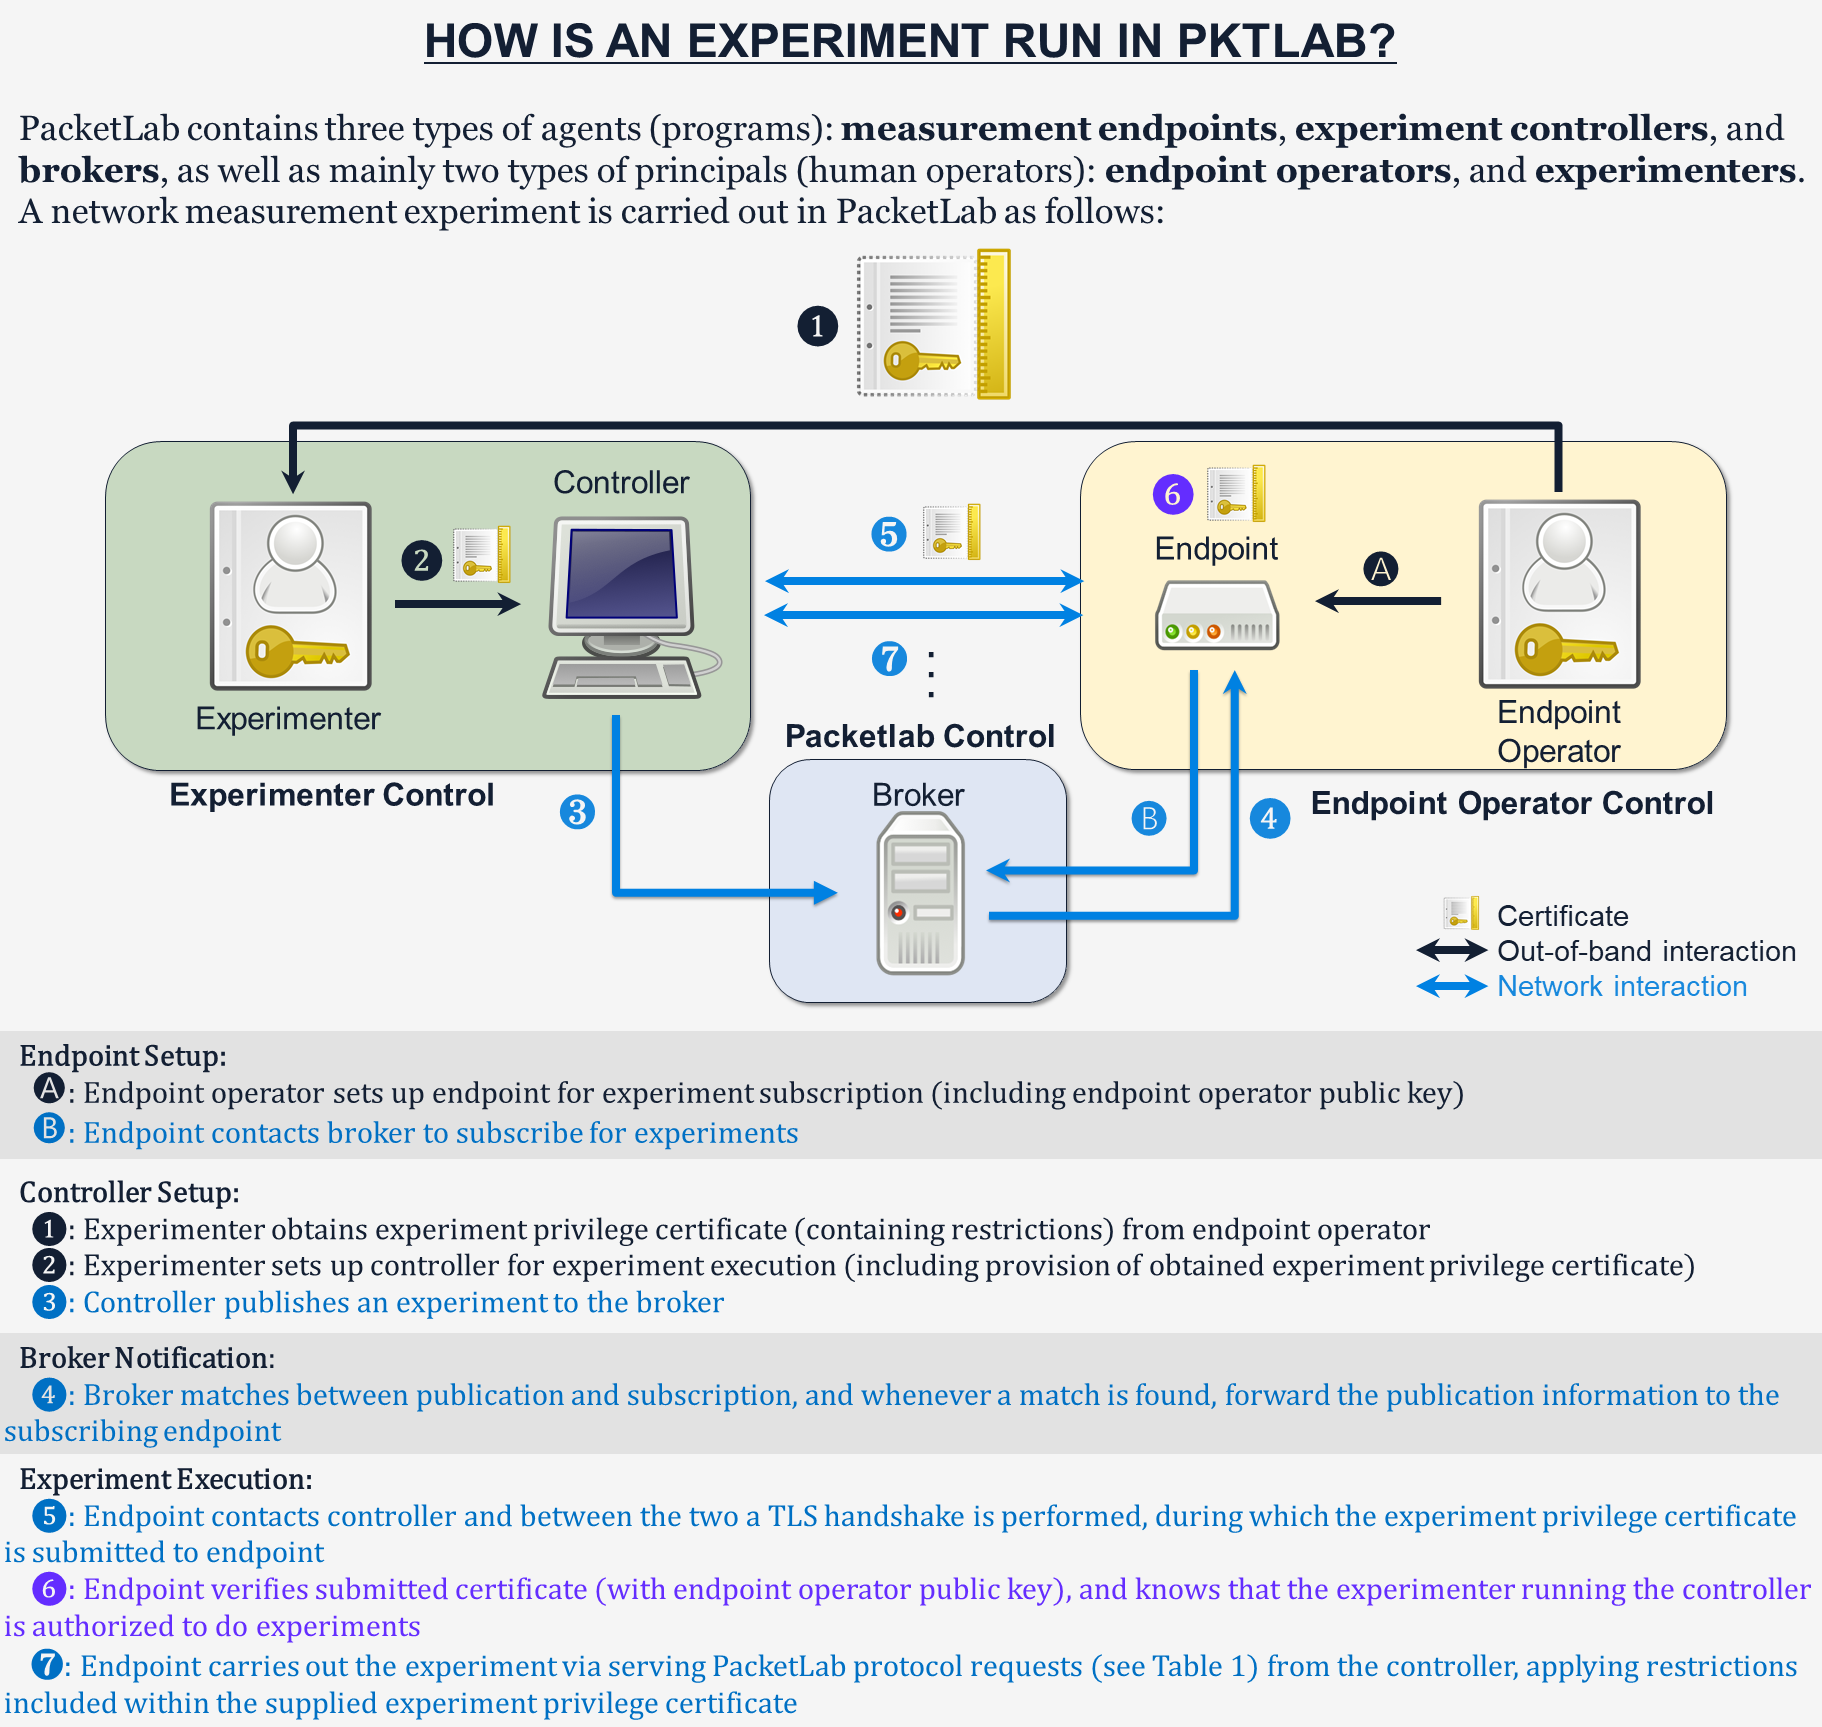
Passive (listen) mode The CAIDA broker forwards the experiment descriptor to the PacketLab team endpoints after being notified of the experiment by pktxpmgr. Receiving the experiment descriptor, the PacketLab team endpoints initiate the connections to the controller described by the descriptor. pktxpmgr then performs TLS handshake with each of the incoming endpoints, exec-ing the mlet test_http_get at the end, which starts issuing PacketLab protocol requests to one of the endpoints over pktxpmgr. By design, test_http_get asks the endpoint (via multiple PacketLab protocol requests) on sending out the HTTP GET request, and receives the forwarded back HTTP response from the endpoint which is then displayed in the terminal. Also see Image 1 below for a graphical representation of the overall process.
Active (proxy) mode The process is similar to the passive case, except that pktxpmgr now connects to the proxy to register for snikeys, and then relies on the proxy to forward the pktxpmgr-endpoint traffic with the correct endpoint.